Adafruit Monochrome 128×32 OLED graphic display
 I recently got my hands on the Adafruit Monochrome 128×32 OLED graphic display for my next project. This is a 128×32 OLED B+W graphics chip and it’s tiny! Don’t let its size fool you however. Being an OLED display, text/graphics contrasts well against the black background. My initial intent for this display was to use it to provide information to you GPS Red Light Camera project. It’s job would be to provide key information such as; the distance to the next red light camera location, the direction of the vehicle (and possibly direction of the camera later on), speed, # of satellites, as well as Lat and Log. However, after some dry runs, I found that reading the information was too difficult if it was sunny out. Of course the obvious holds true that I should not be taking the time to read this sort of info while driving anyhow. The intent was more of an info display for viewing while stopped etc. However, the purpose of this write-up is not to discuss the merits of these things, but rather the quality of this display. More info on the project will come soon.
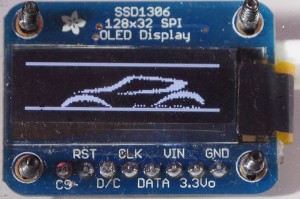
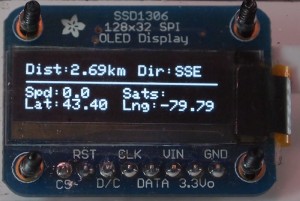
So, how about the quality. My first test was take some graphics and try to render them to the tiny screen. Keep in mind we are working with 128W x 32H pixels here folks. The Adafruit tutorial references a handle little app called LCD Assist that allows you to convert a monochrome bitmap to a character array which you can dump directly into your sketch and have it display the image. The image to the right shows a rendering of a car. The pixelation that is showing is due to my resizing the original image down to something that I could fit on the screen. The two lines are drawn using a built-in drawline function. The second image shows the rendering of text and variables to the screen.

Example (draws Latitude and Longitude and their related values):
Edit: I’ve recently added this display to my Temp / Humidity Monitor.
[ad name=”GoogleAS728x90ImgOnly”]
The good:
- At $17.xx, this is reasonably priced for a small, crisp, thin, OLED package.
- As always, Adafruit does a great job with providing drivers, samples, and a tutorial to help even the newest of noobs get this thing up-and-running.
- It’s thin – really thin. Great for small projects where space is limited but you want to dump lots of info to the screen.
- Four mounting holes are provided on the board. It’s hard to tell, but the above OLED is mounted to a piece of clear acrylic.
- Having the connections all broken out (and labeled) to a header is a must have for those of us who cant work with those tiny ribbon connectors.
- Headers are also supplied – its nice to see small added touches like this and Adafruit does this with most all of their products. The passion shows through. It would be a shame to wait a week or so to find out you don’t have a spare header laying around and your favourite electronics store is closed for the day!
- Support! Let’s not forget the intangibles – Adafruit had an excellent forum where you can post your questions and get answers fast. It’s an excellent community and everyone there is very welcoming and want to help. Even Adafruit staff often weigh in to offer support.
The not so good:
- Wiring: Rrequires a lot of wires – a total of 7. However, this is to be expected given the nature of what it is. I managed to find a flat-wired CAT5 cable in my search for something small and flexible. (The options are limited if you want to keep the cable to a minimum). The problem with this particular cable was that the encompassing insulator is moulded around all 8 internal wires. After carefully stripping back all 8 on both ends, I figured I had to find something else if I was going to do this again (which I am – more in that in another post). As irony would have it, I later came across these. Already ordered 4 for next time around! An aside note: I like to look of people’s faces when they see me take apart things immediately after they arrive. The look of why!? Then they get it once they know what I do for sh*ts and giggles… err… I mean my hobby.
- Sunlight: It was difficult to view the text in bright sunlight while in the vehicle. This is part due to its size and secondly that you can only get so much contrast with this (or most any other) display. I am sure that if I was able to inset the OLED in some sort of compartment, the result would be much better.
- Size: This is a tiny OLED. However, I knew that going in so I can’t really complain. I put this here as it is important to know what you need going into a project. This unit works great if you are working with a project that needs to be small. If you want something a little larger, Adafruit sells a 128×64 OLED that is the sibling to this one. I decided to take another leap and am currently working with the 1.8″ TFT LCD display, and am already very impressed with the result. More on this later.
Other thoughts:
- For simple displaying of text, the provied driver works fine. However, as part of my project, I was animating a road against a vehicle icon and it was too slow for my needs. I followed the simple instructions on this simple tweak you can do to use hardware SPI to speed things up. Once I did this, it ran much faster and supported the necessary animations I was doing.


Comments: