Pulito – Featuring DFlex
Over the summer we installed hardwood flooring – which needs constant sweeping and cleaning . What to do… What to do… Well, most of us would just sweep it, right? Some of us might even go buy a Roomba. But, then again, some of us build something to do it for them. Why? Because we can…
Pulito (Italian for ‘clean’) is simply put, a sweeper robot. Much like a Swiffer and Roomba combined. The intent was to build a robot that could navigate around sweeping hard surface floors, stay away from carpeted areas, make its way under our couches and seek out a docking station when the battery runs low.
Pulito has been 5 months in the making. The biggest challenge was the making of the IR beacon that it uses to navigate to to recharge itself. Pulito is a combination of LEGO Mindstorms parts and other elctronics – most of which are within the beacon itself. The following is a breakdown of features:
Pulito:
- 1 x NXT Brick w/ LiIon battery
- 2x NXT motors (drive wheels)
- 1x Power Functions small motor (sweeper application force)
- 1x HiTechnic IR Seeker V2 (for seeking the charging beacon)
- 1x Dexter Industries – dFlex – flex sensor strip
- 1x Cybermaster touch sensor mutiplexer (allows for 3 touch sensors to be multiplextd to one sensor port)
- 1x custom photo resistor (for detecting the NXT LiIon battery light illumination)
- 2x brass charging bars mounted to the touch detection arms. Wired to custom connector jack attached to the NXT’s Li-Ion batter.
IR Charging Beacon:
- Custom LM556 timer to create 38KHz IR flashing carrier signal and generate the 1200 Hz pulse required by the HiTechnic IR Seeker V2 IR sensor.
- Custom main board power supply to provide 5V and 9V regulated power for the BSII, IR Beacon LEDs, LM555 timer, LCD readout.
- Brass charge bars linked to power supply.
- Powered by 12V Wall Wart.
IR Charging Beacon (original design):
- I have since made some changes to the original beacon to make it more effective. Here are the original version specs.
- Basic Stamp II Sx module to generate 1200 Hz IR flashing signal (for IR Seeker)
- Custom LM555 timer to create 38KHz IR flashing carrier signal.
- LCD readout linked to the BSII. Allows for display of 1200/600 Hz dual modes.
- Custom main board power supply to provide 5V and 9V regulated power for the BSII, IR Beacon LEDs, LM555 timer, LCD readout.
- Brass charge bars linked to power supply.
- Powered by 12V Wall Wart.
- Details on the original beacon design
[ad name=”GoogleAS728x90ImgOnly”]
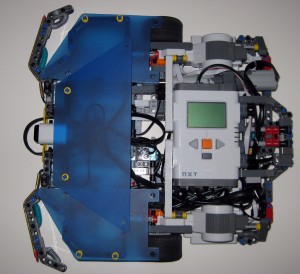
The idea behind the design is a robot that can autonomously navigate a room dragging a cloth around which picks up dust, hair etc while avoiding obstacles and carpeted areas. It does not vacuum. Would be nice, but that is beyond the ability of LEGO components and this guy’s budget. Avoidance is done via a number of sensors and bumpers. The two front ‘antenna’ are used for both object bump detection as well as raised surface detection. Luckily in my case I have raised transition strips between my kitchen and other rooms (ceramic and carpeted areas), so the bump sensors will trigger when the transition strip is touched.
Pulito also has a motor that allows for adjustment of the cleaning pad. It can put more or less pressure on the pad as it see’s fit. It an also raise the pad. At the front of the touch sensors, there are 2 brass rods attached. These are used to charge the unit when it docks to the beacon – more on this later.
Pulito also uses a new sensor from Dexter Industries called DFlex. The sensor consists of a long flat flexible sensor strip that returns variable values depending on how much it is flexed. It does this by varying the resistance as you flex the strip. Within RobotC, you can uses a Raw or Normalized value for the results giving a wide range of options for interfacing with a robot. In this case, the sensor serves a unique purpose. Pulito was built to go under couches and chairs. However, the underside of these objects can vary in height. The backside of Pulito (the NXT) sticks up a bit higher than the front. DFlex allows the robot to navigate under couches and monitors the values of the sensor strip. Once the value hits somewhere between 90-100 (normalized) it is considered too low and Pulito must get out. The following video shows how DFlex allows you to control motor speed. In the video, the right wheel motor will vary its speed as I flex the strip. At full flex, it will go into reverse and avoidance mode. There are also more video’s below.
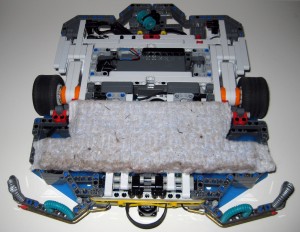
The bottom view shows the cleaning pad (dirty after a number of test runs) as well as some other components. You can also see the charge photoresistor sensor (more later). The motors are setup as direct drive to the wheels and can easily move Pulito around the floor area.
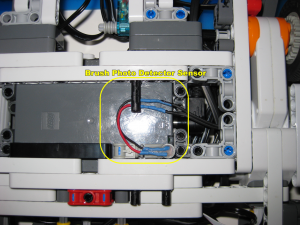
This image shows the photoresitor sensor that I created. Originally, I had hoped to use software to monitor when the NXT LiIon battery was charging, but there is no direct way to do this. They are some internal variables available to monitor battery voltage, but they are not reliable and I needed something that instantly registers when the charger was engaged with the beacon and the battery started to charge. When the Li-Ion battery is connected to a charger, there are 2 LEDs at the bottom – one red and one green. Both light up when the battery is being charged. So, I whipped up this photoresistor sensor that sits directly over the red LED. When Pulito docks to the beacon, the LED lights up immediately. The sensor is easy – it is setup in RAW mode as a LightInactive. When the LED is off, the value is 0. When the LED is on, the value ranges above 0. I trigger it when it hits > 200 units.
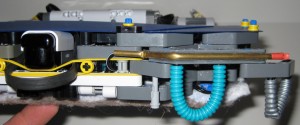
A front view of the shows the left bumper, the flex tubes that track at floor level as well as the brass charge bars. The charge bars meet with the charge plates on the beacon when the unit docks.
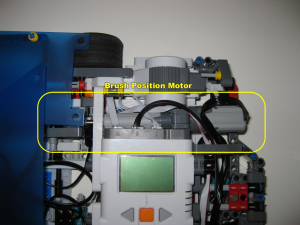
A top view showing the brush position motor. The robot uses a PF small motor linked to a linear actuator and a cam system to raise/lower the cleaning brush. It was a tight fit.
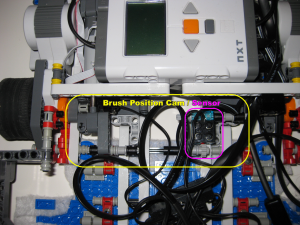
Another top view showing the cam system that links the brush position motor to the brush. To the right is one of 3 Cybermaster touch sensors. This one is used to detect when the brush is in the raised position. The cam attaches to 2 linked set of axles and each axle set is linked together. The brush unit is connected at 4 points. Changing the pad is as simple as disconnecting these 4 points and the entire pad plate (seen in blue).
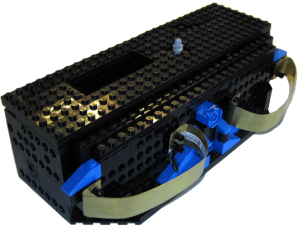
The following is a picture of the charging beacon. Although it looks quite plain from the outside, it is what is inside that resulted in this being a 5 month build (well that and things like kids! 🙂 From the top there is a cutout for the LCD. The purpose of the LCD is to display the change from 1200 to 600 Hz. The gray axle on top is used to swap between frequencies. These frequencies are tuned to work with the HT IR Seeker V2 sensor on Pulito. Together they allow Pulito to detect the beacon from across the room in many varying conditions (incl bright sunlinght). As many of you know, IR is everywhere, so the 1200Hz is used to allow robots to tune into a specific frequency while ignoring other sources of IR. At the front, the 2 charge bars can be seen. These allow Pulito to dock to the unit and begin charging. At the center in the front, the blue cylinder contains 3 IR LEDs. These LEDs are connected internally to a Basic Stamp II Sx which drives a 1200/600 Hz pulse through a separate 555 timer that generates a 38Khz carrier wave. Together the 1200Hz and 38KHz carrier allow the HT IR Seeker V2 to find the beacon. To the left side of the beacon an external wall wart connector has been mounted in 2 1×2 bricks and runs 12 Volts into the system (more like 14V). This is all regulated using the power supply. Additionally, a dedicated (fused) like runs directly to the 2 charge bars (brass things at the bottom left and right) which bring 14V to the Pulito charging system. The fuse is necessary in case there is ever a short across the charge cars (read as my 3 yr old son likes to explore). Of course, its only 14V and pretty much harmless.
The core components consist of th 556 Dual Timer circuit board (left), the main power supply board (middle) and the IR LEDs (x3) to the right. These all fit inside the beacon shell. Now that I am no longer using the BSIISx, I probably could make the beacon smaller.
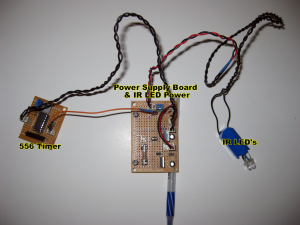
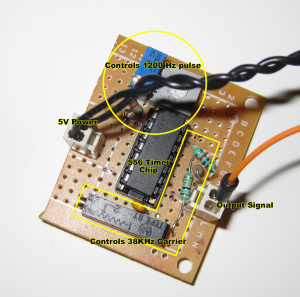
The heart of the beacon is a small circuit that uses a 556 dual timer to generate both the 38KHz carrier and 1200Hz pulse that the HT IrSeeker V2 needs to see to find the beacon from a distance. It works quite well, even when there is ample light coming in from our two large windows.
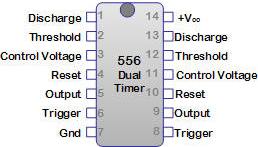
I ended up choosing a circuit described in BotMag based on the Scribbler Robot. The values I used for resistors are slightly different – but close. To the top left, the 1K is the same, the 10K was replaced with a 5K variable resistor (tuned to approx 3.5k).
The ones for the 1K, 10K and 10K POT shown in the middle where the same (as this circuit generates the 38KHz carrier as well). However, I found that I had to tune the 10K POT to 5.44K. I also did not use the 7805 in this circuit as I had it on my power supply. I also did not use the 47uF cap or the 82R resistors/IR LED’s. See below for details on that. Everything else is the same.
In order to determine the correct tuning of the variable resistors, I needed an oscilloscope. Problem was, I did not want to shell out hundreds of bucks for it. However, I found myself more and more in need of measuring simple signals. So, I found the DSO Nano V2. Great little oscilloscope for the hobbyist. Does the trick for simple measurements.
The 556 dual timer (right) has a regulated 5V power supply that runs from the power supply board. To the top right you can see the resistors/caps that are used to generate the 1200Hz pulse. You dont have to use variable resistors here, but it helps to custom tune the circuit. I found that even though I used a number of online calculators to determine the correct resistor/cap combination for R1, R2 and C1, I still needed an oscilloscope to get it right.
- To test/tune the 1200Hz signal (left side) – temporarily ground pin 8 to pin 7 on the 556 timer, then adjust the 5K pot until you get 1200 Hz.
- To test/tune the 38KHz carrier signal – temporarily ground pin 6 to pin 7 on the 556 timer, then adjust the 10K pot until you get 38KHz.
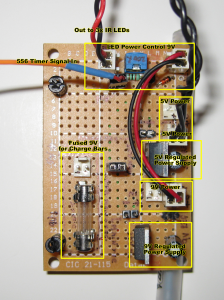
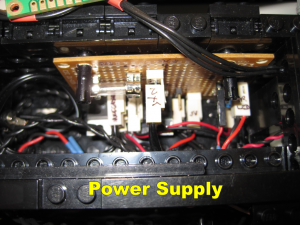
The power supply was built to providepower to a number of sources. In my V1 version of the beacon, I required 5V supplies for the BSIISx, LCD and 9V supplies for the IR LEDs. I also needed to run a straight line to the charging bars. This was all done here. The bottom left shows the power supply for the charge bars. This was fused in the event of a short. It runs the raw (appox 13V) through to the NXT LiIon battery when docked. To the top you can see a small switching circuit that uses a transistor connected to the output of the 556 timer to switch 9V power to ensure the 3 IR LEDs get the most juice possible so that the beacon can be seen from a distance. Along the right side there are 2 sets of regulated power supplies. One uses an LM7805 to provide regulated 5 Volts and the other uses an LM7809 to provide regulated 9 Volts.
A front view of the beacon when powered. The camera shows the beacon IR LEDs illuminated. These LEDs are being driven at 1200Hz with a a 38KHz carrier. Tuned for the HT Ir Seeker V2. When Pulito needs to charge, it seeks out this beacon source and navigates towards it. It was necessary to cover the cylinder with the axle holed plate as the 3 IR LEDs flooded the area with IR and made it more difficult for Pulito to center itself in the beacon base. This way, the IR light is not as dispersed. This also limits the distance of detection, but this is not an issue in the area that this setup is running within.
Pulito seeking out the beacon. I created a task that monitors the battery voltage. When it reaches below a certain threshold Pulito will switch from ‘cleaning’ mode to ‘beaconseeking’ mode.
Pulito cleaning. Video has speed increased 4x to make it less boring…
I attached a Swiffer to the bottom to ensure that the dust is caught and ‘locked in’ as they say on their commercials. Works quite well for the fine stuff! Admittedly, the robot pretty much just pushes around the big crumbs… I need a vaccume for that




Very nice build!
Have you thought of using one of the cheap “keyboard vacs” that you can get from places like DealExtreme to deal with the big crumbs?
Thx! The thought did cross my mind. I would probably need a few of those crammed into the innards to get enough suction power though.
Very cool!
Mike
Amazing work, Dave!
Excellent work, thanks! I’m hoping to build Pulito with my 7 yr old grandson.
Awesome work indeed!
I’m thinking about doing something like this. But I will do it with vacum ability. Take a look at 12v car vacums, I think they have enough suction power for about anything 🙂
[link removed]
^^ Something like that ^^
Will get one together with some parts and start building my monster!
The only challenge with a 12V vacuum is that you need a battery sufficient to power the 12 volts it requires AND enough juice to support the current draw. That’s a pretty big battery. Do post back when you have come up with something, would love to see it.
What happens when it runs out of battery out of sight of the beacon? Cool project anyways 🙂
a) it never strays far from the beacon and b) it begins seeking the beacon well before the battery dies. The trigger voltage can be set to 1/10ths of a Volt.
great work….keep on doing inspirational things
I am hoping to build pulito’s twin using arduino.
Nice project…. are there more detailed build instructions?
Hi
I wonder if you have time to post build instructions ?
would also like to make one like this… maybe with some sort of vacum thou i know it will a hard one to do…
having a 3D printer and seeing this makes me itch to try and replicate it
Hi,
Unfortunately, Pulito was built some time ago, and I never did get time to put instructions together. What I have posted is all I have.
can you provide a instructable on this i really want make it
nice work
Thanks for the comment. Unfortunately, Pulito was built quite some time ago, and I didn’t document the construction at the time.